Wooden crates have been a cornerstone of packaging, storage, and transport for centuries, valued for their durability, protective qualities, and versatility. While many crates are designed for simple closure, the addition of locks elevates their function, providing enhanced security for valuable contents, controlled access, or tamper-evident features. The process of making wooden crates with integrated locking mechanisms combines traditional woodworking techniques with careful consideration for security hardware, demanding precision in design, construction, and assembly. This comprehensive guide will delve into the various stages of crafting such crates, from initial design and material selection to the intricate installation of locking systems, ensuring both structural integrity and secure containment.
1. Design and Planning: The Blueprint for Security
The journey of creating a locked wooden crate begins with a meticulous design phase. This stage is crucial for defining the crate’s purpose, dimensions, structural requirements, and, most importantly, the type and placement of its locking mechanism.
Determine Purpose and Contents: What will the crate hold? (e.g., tools, valuables, sensitive documents, fragile items). What level of security is required? (e.g., basic deterrence, moderate security, high-security archival). This dictates the material strength, construction method, and lock type. Dimensions and Load Capacity: Calculate the internal and external dimensions. Consider the weight of the contents and the crate itself. This will influence wood thickness and joint strength. Wood Type Selection: Softwoods (Pine, Fir): Economical, lightweight, easy to work with. Suitable for general-purpose crates requiring moderate security. Hardwoods (Oak, Maple, Birch): More durable, denser, and stronger. Ideal for heavy-duty crates, high-security applications, or those needing a refined aesthetic. Plywood/OSB: Cost-effective, stable, and strong, especially for larger crates. Often used for panels, while solid wood is used for framing. Joint Selection: Butt Joints (with fasteners/reinforcement): Simple, but weakest. Suitable for light-duty crates. Dado or Rabbet Joints: Stronger, provide more surface area for glue and fasteners. Good for moderate security. Box Joints/Finger Joints: Very strong, excellent for heavy loads and high security, creating a robust connection between panels. Dovetail Joints: The strongest and most aesthetically pleasing, often used for heirloom or high-end crates. Locking Mechanism Integration: Type of Lock: Padlock hasp, cam lock, mortise lock, combination lock, key lock, toggle clamp with padlock eye. The choice affects design, mounting space, and security level. Placement: Determine the optimal location for the lock(s) – typically on the lid, integrated into the side, or on an access panel. Reinforcement: Plan for internal or external reinforcement around the lock to prevent pry attacks (e.g., metal plates, thicker wood blocks). Hardware and Handles: Plan for hinges (if applicable), handles, corner protectors, and any internal bracing or padding. 2. Material Preparation and Cutting
Once the design is finalized, the raw wood materials are prepared and cut to precise dimensions.
Lumber Selection and Inspection: Choose straight, unwarped lumber free of significant knots, cracks, or defects that could compromise strength or appearance. For panels, select high-quality plywood or OSB appropriate for the crate’s intended use. Milling (Optional but Recommended for Aesthetics/Precision): If using rough lumber, mill it to final thickness, width, and flatness using a jointer and planer. This ensures square, true stock for accurate joints. Cutting Components: Using a table saw, miter saw, or track saw, cut all crate components (sides, top, bottom, and any internal bracing) to their exact dimensions according to the cutting list from the design phase. Label each piece to avoid confusion during assembly. Precision in cutting is paramount, as inaccurate cuts will lead to gaps, weak joints, and difficulty in fitting the lock. 3. Joinery and Assembly of the Crate Body
This stage involves constructing the main structure of the crate.
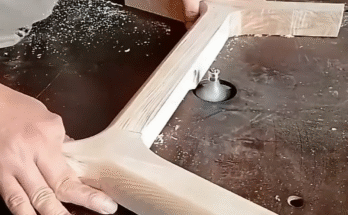
Creating Joints: For Dado/Rabbet Joints: Use a router with a straight bit or a table saw with a dado blade to cut the grooves and rabbets on the edges of the panels. For Box/Dovetail Joints: Use a router jig, dedicated dovetail jig, or a specialized machine to cut the interlocking pins and tails. Dry Fit: Before applying any glue, dry-fit all components to ensure they fit together snugly and square. Make any necessary adjustments now. Gluing and Fastening: Apply a suitable wood glue (e.g., PVA wood glue) to all mating surfaces of the joints. Assemble the sides, bottom, and any internal bracing. Use clamps to hold the joints tightly while the glue dries. Ensure the crate remains square using a large carpenter’s square or clamping jigs. Reinforce glued joints with fasteners (nails, screws) as required by the design, ensuring they do not interfere with future hardware installation. Allow adequate drying time for the glue as per the manufacturer’s instructions, typically 24 hours, before removing clamps and proceeding. 4. Lid Construction and Fitting
The lid is a critical component, especially for a lockable crate, as it directly integrates with the locking mechanism.
Lid Panel Cutting: Cut the lid panel to the exact dimensions, accounting for any overhang or rabbet for a flush fit. Hinge Mortising (If Applicable): If using flush hinges, mortise (cut recesses for) the hinge leaves into the back edge of the lid and the corresponding back edge of the crate body. This ensures the lid sits flush and operates smoothly. Hinge Attachment: Secure the hinges to the lid and crate body using appropriate screws. Test the lid’s opening and closing action. Fit and Alignment: Ensure the lid fits snugly and aligns perfectly with the crate opening. Any gaps or misalignment can compromise the lock’s effectiveness. 5. Lock Installation and Reinforcement
This is the most critical stage for a secure crate, requiring precision and attention to detail.
Marking Lock Placement: With the lid closed and properly aligned, carefully mark the exact locations for the lock components (e.g., the hasp and staple for a padlock, the barrel of a cam lock, or the body of a mortise lock). Use a pencil and a combination square for accuracy. Cutting Mortises/Boring Holes: For Padlock Hasps: Drill pilot holes for the screws that secure the hasp and staple. For Cam Locks: Use a Forstner bit or hole saw to bore the main hole for the lock barrel, and then drill smaller pilot holes for the mounting screws or retaining nut. For Mortise Locks: Carefully chisel out a mortise (recess) in the edge of the lid and a corresponding strike plate recess in the crate body. This requires significant precision. Adding Reinforcement: Internal Plates: For higher security, install metal plates (steel or brass) on the inside of the crate and/or lid where the lock attaches. These can be glued and screwed, or bolted through for maximum strength, preventing the lock from being pried off. Thicker Blocks: Add internal wooden blocks or laminated sections to provide more material for the lock screws to bite into. Attaching the Lock Hardware: Carefully secure the lock components using appropriate screws or bolts. Ensure all screws are fully seated and tight. Test the lock’s functionality: Does it engage smoothly? Does it secure the lid firmly without excessive play? For padlocks, ensure the staple is robust and the hasp fully covers the screws. Addressing Potential Weak Points: Consider adding metal corner protectors or strapping to deter prying attempts at seams. Ensure all fasteners (screws, nails) are long enough to provide adequate hold without protruding. 6. Finishing Touches
The final steps enhance the crate’s durability, appearance, and overall functionality.
Sanding: Sand all surfaces of the crate to a smooth finish, starting with a coarser grit (e.g., 80-120) and progressing to finer grits (e.g., 180-220). This prepares the wood for finishing and removes any rough edges. Dust Removal: Thoroughly clean all sawdust from the crate using compressed air or a tack cloth. Applying Finish: Paint: Provides color and protection. Stain: Enhances the natural wood grain. Varnish/Polyurethane: Offers excellent protection against moisture, abrasion, and wear, crucial for durability. Apply multiple thin coats, sanding lightly between coats. Attaching Handles and Other Hardware: Once the finish is dry, attach any handles, latches (if separate from the lock), or corner protectors. Internal Lining (Optional): For delicate contents, line the interior with felt, foam, or fabric. Key Considerations for Security and Durability Wood Type and Thickness: Hardwoods and thicker panels provide greater resistance to forced entry. Joint Strength: Strong mechanical joints (box, dovetail) are inherently more difficult to compromise than simple butt joints. Fastener Type and Placement: Use appropriate screws (e.g., construction screws for strength) and ensure they are strategically placed and long enough. Bolting through with washers and nuts provides superior security for lock components. Lock Quality: Invest in a high-quality lock. A cheap lock on a well-built crate is a weak link. Reinforcement: Metal reinforcement around the lock and at vulnerable points (corners, seams) significantly improves security. Concealment (Optional): For very high security, consider recessing locks and hinges entirely within the wood to prevent direct attack. Environmental Factors: If the crate will be exposed to moisture, use waterproof glues and outdoor-rated finishes. Conclusion
The process of making wooden crates with locks is a rewarding endeavor that combines practical woodworking skills with an understanding of security principles. From the initial design, through careful material preparation and precise joinery, to the critical integration and reinforcement of the locking mechanism, each step contributes to the crate’s overall strength and protective capability. Whether for personal storage, professional transport, or the secure housing of valuable items, a well-constructed and properly locked wooden crate offers a tangible blend of craftsmanship, utility, and peace of mind.


